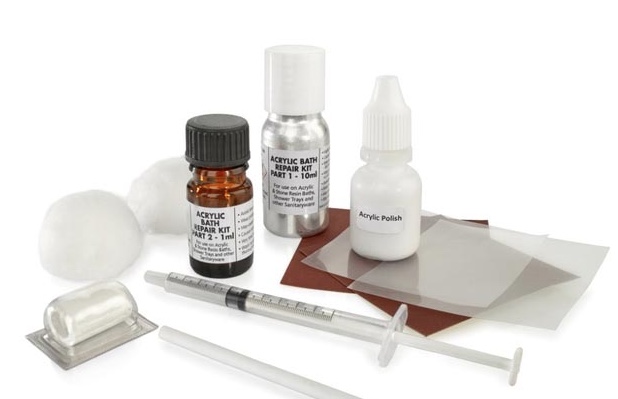
Note: The contents of the components within the box could vary slightly from time to time.
How to use
Each kit contains
- Part 1 – 10ml aluminium container
- Part 2 – Brown bottle
- Stirring rod
- Polythene film
- Wet and dry emery paper
- Acrylic polish
- Cotton wool ball
- Syringe
- Protective gloves
- Piece of epoxy putty (Putty Kit, Shower Tray Repair Kit)
- Piece of reusable tack
- Isopropanol cleaning wipe
Video guides
How to use the kit
Add complete contents of brown bottle Part 2 to Part 1.
The volume of the product in the Part 1 and Part 2 containers is measured to the exact mixing ratio. This ensures the complete elements, when mixed together thoroughly set within the time stated. If a smaller amount is required, dispense two drops of Part 2 directly from its container to every 1ml of Part 1.
Mix Part 1 and Part 2 in the aluminium container using the rod provided.
Extract the mixed liquid using the syringe.
Apply with the syringe and overfill the mixed solution on the damaged area.
Smooth out any air bubbles using the polythene film and leave to cure for approx. 12 – 24 hours (Bath Repair Kit) or 3 – 6 hours (Rapid and Putty Kit) or 1 hour with the Shower Tray Repair Kit.
Rub down with wet and dry emery paper provided.
Polish to a smooth finish.
How to use the epoxy putty
Anglo epoxy putty
Epoxy putty is an easy to mix steel reinforced epoxy putty. Once set it is as hard as steel.
- Is an easy to mix steel reinforced epoxy putty. Once set it is as hard as steel.
- It can be drilled, filed, sanded, machined or painted just one hour after use.
- It can be applied, and will set, in wet conditions.
- Bonds permanently to aluminium, brass, copper, steel, fibreglass, glass, hard plastic, ceramics wood and most other materials.
- Resistant to temperatures up to 150°c
Surfaces to be bonded should be clean, dry and free from dust. Before use, remove plastic film around the mono-dose.
- Break off the right amount of putty required to fill the hole/repair area.
- Knead the putty between your fingers for 1 minute until a uniform white colour is obtained.
- When using the Anglo epoxy putty in connection with an Acrylic Bath Repair kit, if possible, always apply from underneath the bath/shower tray.
- Always ensure that there is a minimum gap between the putty and the bath surface of 3-4mm.
- If the putty is to be applied from the top, ensure to depress until the minimum gap fill is achieved (as above).
The epoxy putty will harden after 5 minutes and be at full strength after 24 hours.
Applying the bath repair kit solution
on a vertical damage
If the damage is at a vertical angle use the reusable tack or a similar product to create a reservoir to retain the liquid on the damaged area whilst curing. Alternatively, you may attempt to allow the product to partially cure for approx 15 minutes which will reduce the risk of the liquid escaping from the damaged area. Please note that the liquid will cure (become more viscous) more rapidly when in mass (ie. left in the aluminium container).